
Web
and Book design,
Copyright, Kellscraft Studio 1999-2010 (Return to Web Text-ures) |
 (HOME)
|
| CHAPTER III
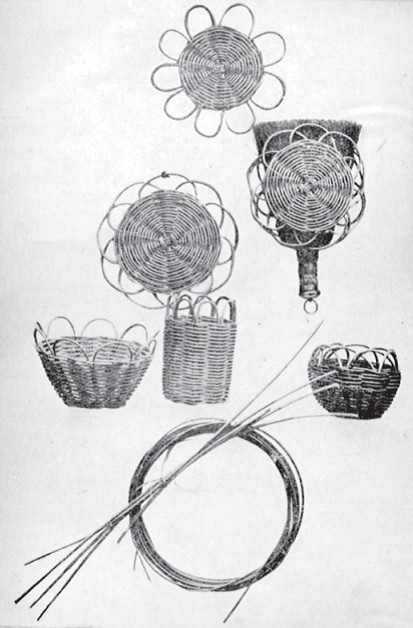
MATS AND THEIR BORDERS THE centre, which forms the bottom of the basket is the starting-point, and it is such an important part to master that we will make at least two centres in the form of mats before beginning a basket.
Materials: 4 12-inch spokes of No. 4 rattan, 1 7-inch spoke of No 4 rattan, 1 weaver of No. 2 rattan.
The four spokes, arranged in pairs, are crossed in the centre, the vertical ones being uppermost or nearest the person weaving; and between the upper halves of these vertical spokes the half spoke seven inches long is placed. These are held in position by the left hand, which is, as always, the one that holds while the right is the weaving hand. An end of the weaver previously unwound is placed along the horizontal spoke back of the vertical ones with the end toward the right. The forefinger of the right hand now presses the weaver across the upper vertical spokes and down behind the horizontal ones on the right (thus binding the end of the weaver securely), next over the lower vertical spokes, and behind the horizontal ones on the left (see Fig. 9). This is repeated, and then beginning with the upper vertical spokes, the spokes are separated and the weaving begins (see Fig. 10). A common fault of beginners is to pull the weaver from a distance of several inches from the work; instead it should be pressed with the forefinger, under and over the spokes, as close to the work as it is possible to get it. The spokes should be very evenly separated — this is something that the beginner cannot be too careful about, as upon it so much of the symmetry and strength of his baskets will depend. It may help him to think of the regular spaces betweenthe spokes of a
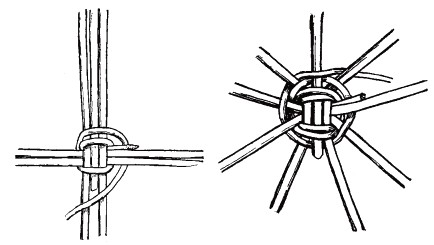 FIG. 9. FIG. 10
 MATS AND THEIR BORDERS AND THE SIMPLEST BASKETS wheel
and how much trouble one
badly placed spoke would
make. When there is just enough weaver left to go around once, the
binding off is begun. This is a process much like overcasting.
After going under one spoke and over another, the weaver is passed
under the last row of weaving just before it reaches the next spoke,
it then goes behind that spoke, in front of the next and under the
last row of weaving before the next spoke. When a row of this binding
is completed, the mat is finished with
Open Border No. 1. — After cutting the spokes to a uniform length with a slanting cut (so that the point may be easily pushed down between the weavers), the spokes should be held in water for a few minutes. When quite pliable, spoke No. 1 is pushed down beside spoke No. 2, No. 2 beside No. 3, and so on around the mat, taking care that at least an inch is pressed below the edge of the mat.
Materials: 4 14-inch spokes of No. 4 rattan, 1 8-inch spoke of No. 4 rattan, 2 weavers of No. 2 rattan. This mat is started like the first one and woven in the same way until the end of the first weaver is reached, when another is joined to it by simply crossing the weavers, at an inch from the end of each, back of a spoke (See Fig. 11). The ends may need to be held, or replaced in position while weaving one row after which they will keep their places and may be cut shorter when the mat or basket is finished and dry.
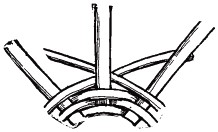 FIG. 11 — JOINING WEAVERS This method of joining weavers has the advantage of not showing on the right side of the work. When the end of the second weaver is reached, bind off as in the first mat and finish with Open Border No. 2. — Spokes at least four inches long, measuring from the last row of weaving, are required for this border. Cut and soak as described in Open Border No. 1. Spoke No. 1 crosses No. 2 and is pushed down beside No. 3. Number 2 crosses No. 3 and is pushed down beside No. 4 and so on around the mat. Even these first little mats are useful to put under a tea-pot on the table, or two tied together with ribbons or with their borders interlaced will make a serviceable whisk-broom holder. |
 Click the book image to turn
to the next Chapter.
Click the book image to turn
to the next Chapter.