Web
and Book design,
Copyright, Kellscraft Studio 1999-2010 (Return to Web Text-ures) |
 (HOME)
|
| CHAPTER II
RAFFIA AND SOME OF ITS USES IT is a rare thing to find a material at once so soft and so strong as raffia; and it could hardly be better fitted for the work of children's fingers if it was made for the purpose. With a pound or two of raffia (there is about as much as this in one of the hanks that can be bought at seed stores or of dealers in kindergarten supplies), a paper of tapestry needles, a pair of scissors, and several flat sticks about a yard long and half an inch wide, you are well equipped. Given in addition to these some children fresh from the kindergarten training of eye and hand, and you can accomplish wonders. Indeed, so many charming things can be made from one of the great, yellow coils of raffia that it reminds one of the fairy tale in which the little gnome spun a roomful of straw into gold for the miller's daughter. First of all, the children may braid some raffia, — we will use so much of it in this form, and now, as later in rattan work, it is well for them to learn to prepare the materials they are to work with. Three single strands of raffia may be used in braiding, if the plait is to be very fine; two pieces of the raffia in each strand makes a better Size for general use. If the raffia is slightly dampened before the braiding is begun, it will work more smoothly. The ends are tied together and attached to a hook or chair back, and then the child braids to the end of the strands or until they become thin and spindling, when other strands are laid in, always on the under side, so that the little ends will not show on the upper or right side. These ends may be cut quite close when the braid is done. It is hardly necessary to say that the braiding should be even and firm. 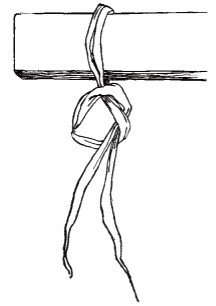 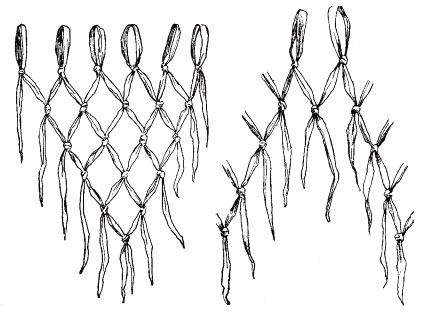 FIG. 6 FIG. 7 FIG. 8
Materials: 24 strands of raffia, A stick about a yard long and 1 1/2 inches wide, A pair of scissors, A tapestry needle.
The stick is held by the left hand at right angles with the body, the end resting on a chair or table. A strand of raffia is doubled and tied around the stick, as shown in Fig. 6, the knot being drawn up quite close. Twenty-four strands are knotted on in this way; they are then placed about an inch apart, and beginning with the inner one of the two strands nearest the workman, it is knotted, at about an inch from the first row of knots, with the strand nearest it in the next pair, making an even mesh. This is continued across the stick, and another row is knotted and another until ten or twelve rows have been made, when the work will tend toward a V shape (see Fig. 7, which for convenience is drawn with fewer strands) The stick is now slipped out and the bag finished (see Fig 8) by knotting first the two loose strands at the top together, then the two pairs following, and so on until the bottom is reached. The two sides are joined at the bottom by placing them with the meshes and knots evenly together and knotting two strands from the front and two from the back together each time in a last row of knotting. The ends of the raffia when cut to an even length make a fairly satisfactory finish, but the following is a better one: Wind a strand of raffia over a card, about two and a quarter inches wide, five or six times, then slip it off and bind it around several times near the top with the end of the strand, sewing it fast with a tapestry needle; this forms a little tassel, such as are made of worsted. A row of these across the bottom of the bag, a cord of twisted raffia (as worsted cords are made), drawn through the top loops and an inner lining of turkey-red cotton will complete this pretty and serviceable bag.
 RAFFIA AND SOME OF ITS USES
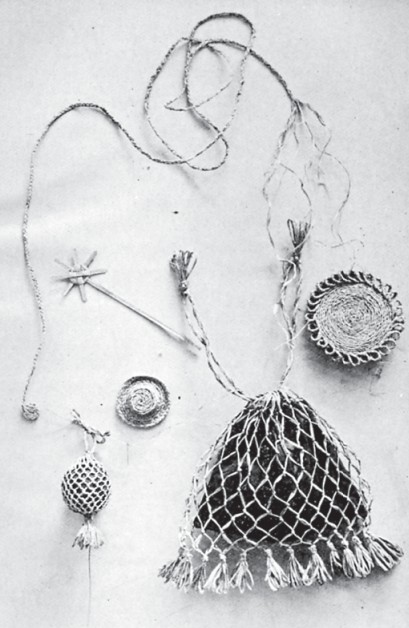
Materials: 17 strands of raffia, A stick the size of a lead pencil, A pair of scissors, A ball of twine, A tapestry needle.
It will be well to get your ball of twine before beginning this bag, to make sure of its fitting. A common lead pencil, provided it is a long one, will do quite as well as a special stick, and the raffia is knotted on it as described in the directions for a work bag, only there are seventeen strands instead of twenty-four; they are placed closer together, not over a quarter of an inch apart, and the rows of knotting are about a quarter of an inch from each other. When twelve rows are completed, the work is slipped off and finished as in the work bag. The bottom should be drawn up tightly, with a needleful of raffia, and a ball of twine of some bright harmonious color slipped in. A cord to gather up the loops at the top and a large tassel at the bottom will be the finishing touches to a dainty gift that any child may be proud to offer as his own work.
Materials: 1 spoke 10 inches long of No. 6 flat rattan, 3 spokes 3 1/4 inches long of No. 6 flat rattan, 1 strand of raffia, A tapestry needle. A book-mark that is pretty and easily woven is made on an Indian pattern, with the Indian arrangement of spokes and weavers. After soaking the spokes for an hour in cold water, the long spoke, No. 1, is laid on a table vertically; No. 2, one of the short spokes, is then placed across it horizontally, at a distance of a little over an inch and a half from the end. Number 3, a short spoke, is laid across the other two obliquely, to the right of the upper end of spoke No. 1, and between it and the right end of spoke No. 2. Number 4 crosses from the left of spoke No. t obliquely, completing the star shape. A strand of raffia is doubled at its centre around spoke No. 1, with the ends toward the right. It is woven by pairing (see Chapter I) to a distance of one inch from the tip of each spoke, when the ends of the raffia are threaded through a worSted or tapestry needle and sewed off under the weaving, and the tips of the short spokes are cut in points.
Materials: 6 yards of braided raffia, Several strands of loose raffia, A tapestry needle, A pair of scissors The braided raffia previously prepared now comes into use. A tapestry needle is threaded with a fine strand of raffia, and the mat is begun by winding the end of the braid several times with the end of the strand which is threaded through the needle. A coil is then started with the end of the braid, the edge of the braid being up, not the face, and it is sewed through at least three braids at a time in stitches which run in the direction of the twists in the braid. The needle is run in slanting down 'from right to left and then up from right to left, forming a V within the coil. The mat is coiled round and round in this way till it is about four inches in diameter, when a border of the braid, sewed on in loops, completes it. These mats may be dyed or stained, or a large, colored bead is sometimes sewed in each loop of the border.
Materials: 2 yards of braided raffia, A tapestry needle, Several strands of loose raffia, A pair of scissors.
The idea of making her own doll's hats will be a delightful and novel one to the small girl, and hats of all sizes and shapes are possible when she has once mastered the sewing together of the braided raffia. Just as in large hats we will start with the very centre of the crown, and that is coiled and sewed in the same way as the raffia mat was done, till it is an oval mat about one and a half by two inches; the coil of braid is then brought round with its upper edge just below the centre of the previous row. The next row is sewed around in the same way and the next until the crown is the desired height. We shall have to be careful to draw the braid tight, and in sewing to make the stitches run like the twists in the braid so that they will show as little as possible. The brim is made by flattening out the braid and letting it go more easily, taking care, however, to see that it overlaps the last row nearly to the centre of the braid in each case. When the brim is about an inch wide, one or two rows are drawn quite tightly as they are sewed on, which gives a roll to the edge of the brim, and it is finished by sewing the end of the braid firmly down on the under side of the brim. Many soft raffia baskets, oval and round, can be made on the principle of the crown of this hat, and we shall learn in subsequent chapters how to make more elaborate baskets of this material. |
 Click the book image to turn
to the next Chapter.
Click the book image to turn
to the next Chapter.