
Web
and Book design,
Copyright, Kellscraft Studio 1999-2016 (Return to Web Text-ures) |
 (HOME)
|
| HOW
TO MAKE A MORRIS CHAIR The stock necessary to make a morris chair of craftsman design as shown in the engraving can be purchased mill-planed and sandpapered on four sides as given in the following list: 4
posts 1 3/4 by 3 by 36 in.
2 front and back rails 7/8 by 5 1/2 by 24 in. 2 side rails 7/8 by 5 1/2 by 28 in. 2 arm pieces 7/8 by 5 1/2 by 37 in. 7 slats 3/8 by 2 by 24 in. 2 cleats 1 by 1 by 22 1/2 in. 2 back stiles 1 by 2 1/2 by 24 1/2 in. 2 back rails 1 by 2 by 17 in. 3 back slats 3/8 by 1 1/2 by 19 in. 1 back support 3/4 by 3/4 by 24 in. 2 support rests 1 by 1 1/2 by 8 1/2 in. 2 dowels 1/2 in. diameter, 6 in. long. First make and put together the sides of the chair., While the glue is setting on these parts make and assemble the back. The front and back rails may next be made and placed and the cleats and bottom slats fastened. With the adjustment of the back the chair is ready for the finish. The posts are to be tenoned on the upper ends. These tenons are to project 3/16 in. above the arm and should be slightly beveled. The lower ends of the posts, likewise, all other projecting ends, should be beveled to avoid their splintering. All sharp corners, as on the arms, should be sandpapered just enough to take their sharpness off, so as not to injure the hand. That the chair may be properly inclined, the rear posts are cut 1 in. shorter than the forward ones. To get the correct slant on the bottoms of these posts, lay a straightedge so that its edge touches the bottom of the front post at its front surface, but keep it 1 in. above the bottom of the rear post. Mark with pencil along the straightedge across both posts. At the rear ends of the arms are the notched pieces that allow the back to be adjusted to different angles. These pieces may be fastened in place either by means of roundhead screws from above or flatheads from underneath the arms. The notches are to be cut 3/4 in. deep. If more than three adjustments are wanted, the arms must be made correspondingly longer. The dimensions for the tenons on all the larger pieces will be found on the drawing. For the back, the tenons of the cross pieces, the rails, should be 3/8 by 1 1/4 in. For the slats, the easiest way is to not tenon them but to "let in" the whole end, making the mortises in the rails 3/8 by 1 1/2 in. This will necessitate cutting the sides of the mortises very accurately, but this extra care will be more than compensated by not having to bother with the cutting of tenons on each end of the three back slats. To finish the chair, put on a coat of water stain, first removing all surplus glue and thoroughly scraping and sandpapering ail the parts that were not so treated at the mill. The color of the stain will depend upon the finish desired, whether golden, mission, etc. Water stains cause the grain of the wood to roughen, so it will be necessary to resandpaper the surfaces after the stain has dried, using fine paper. Next apply a coat of filler colored to match the stain. Directions for its application will be found upon the cans in which the filler comes. After the filler has hardened put on a very thin coat of shellac. What step is taken next will depend upon what kind of a surface is desired. Several coats of polishing wax may be put on. This is easily done — directions will be found on the cans — and makes the most satisfactory finish for mission and craftsman furniture. It is the easiest to apply. Several coats of shellac or of varnish might be put on instead of wax. Each coat of the shellac should be rubbed when thoroughly dried with curled hair or fine steel wool or fine oiled sandpaper. Rub the first coats of varnish with hair-cloth or curled hair and the last coats with pulverized pumice stone and crude oil or raw linseed oil. Cushions for the chair can be made at home. They may be made of art leather such as Spanish roan skin and the top and bottom parts fastened together by lacing leather thongs through holes previously punched along the edges of the parts. A very pretty effect is obtained by using thongs of a different but harmonious color. The manner of lacing may be any one of the various laces such as are used in lacing belts or as shoestrings. These cushions may be filled with hair or cotton felt. Denim or burlap may also be used as a covering and are much less expensive than the leather. Lace one side and the two ends, then place filling and finish lacing. Art leather cushions retail at from $16 to $20 a pair and the denim and burlap at $6 to $9. The bottom cushion should be made the full size of the chair. The front and back rails extend a little above the slats and thus hold it in place. The back cushion will settle down a little and therefore may be made nearly the full length from the slats to the top of the back. 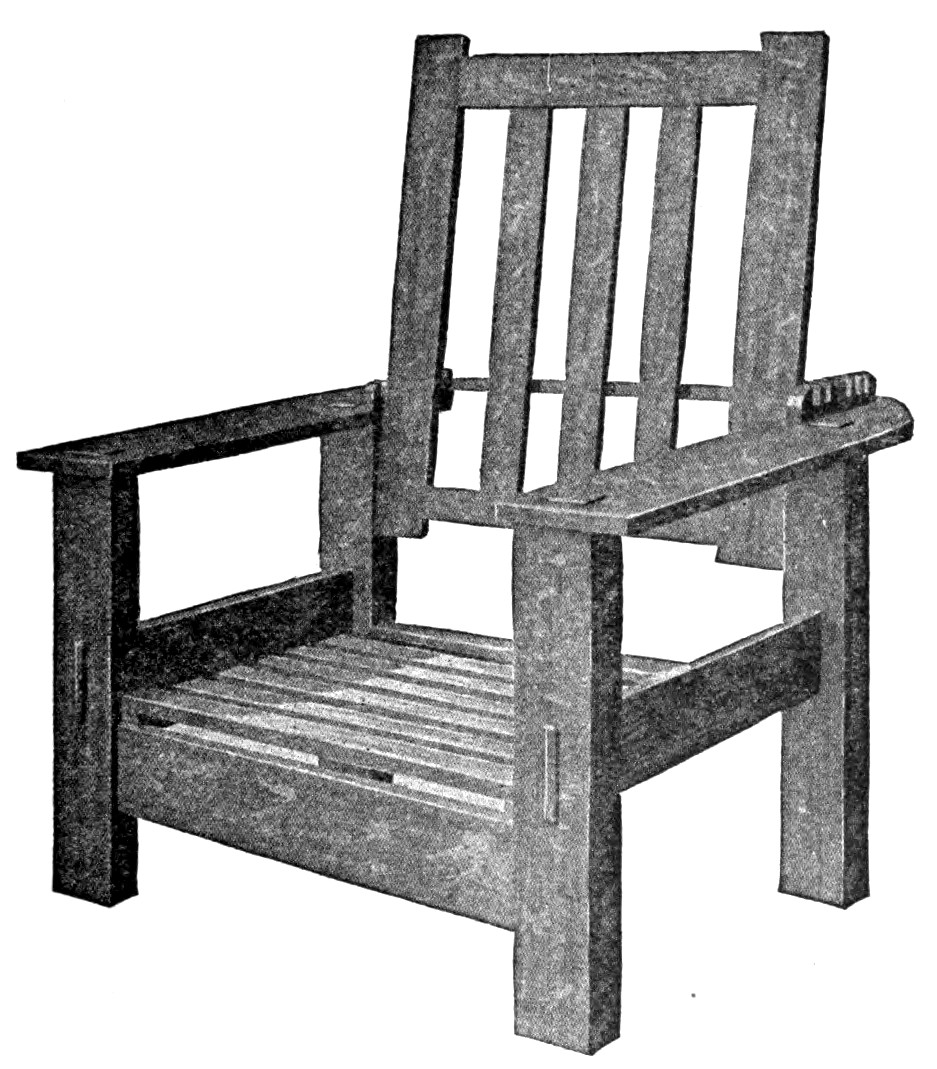 Complete Morris Chair Without Cushions 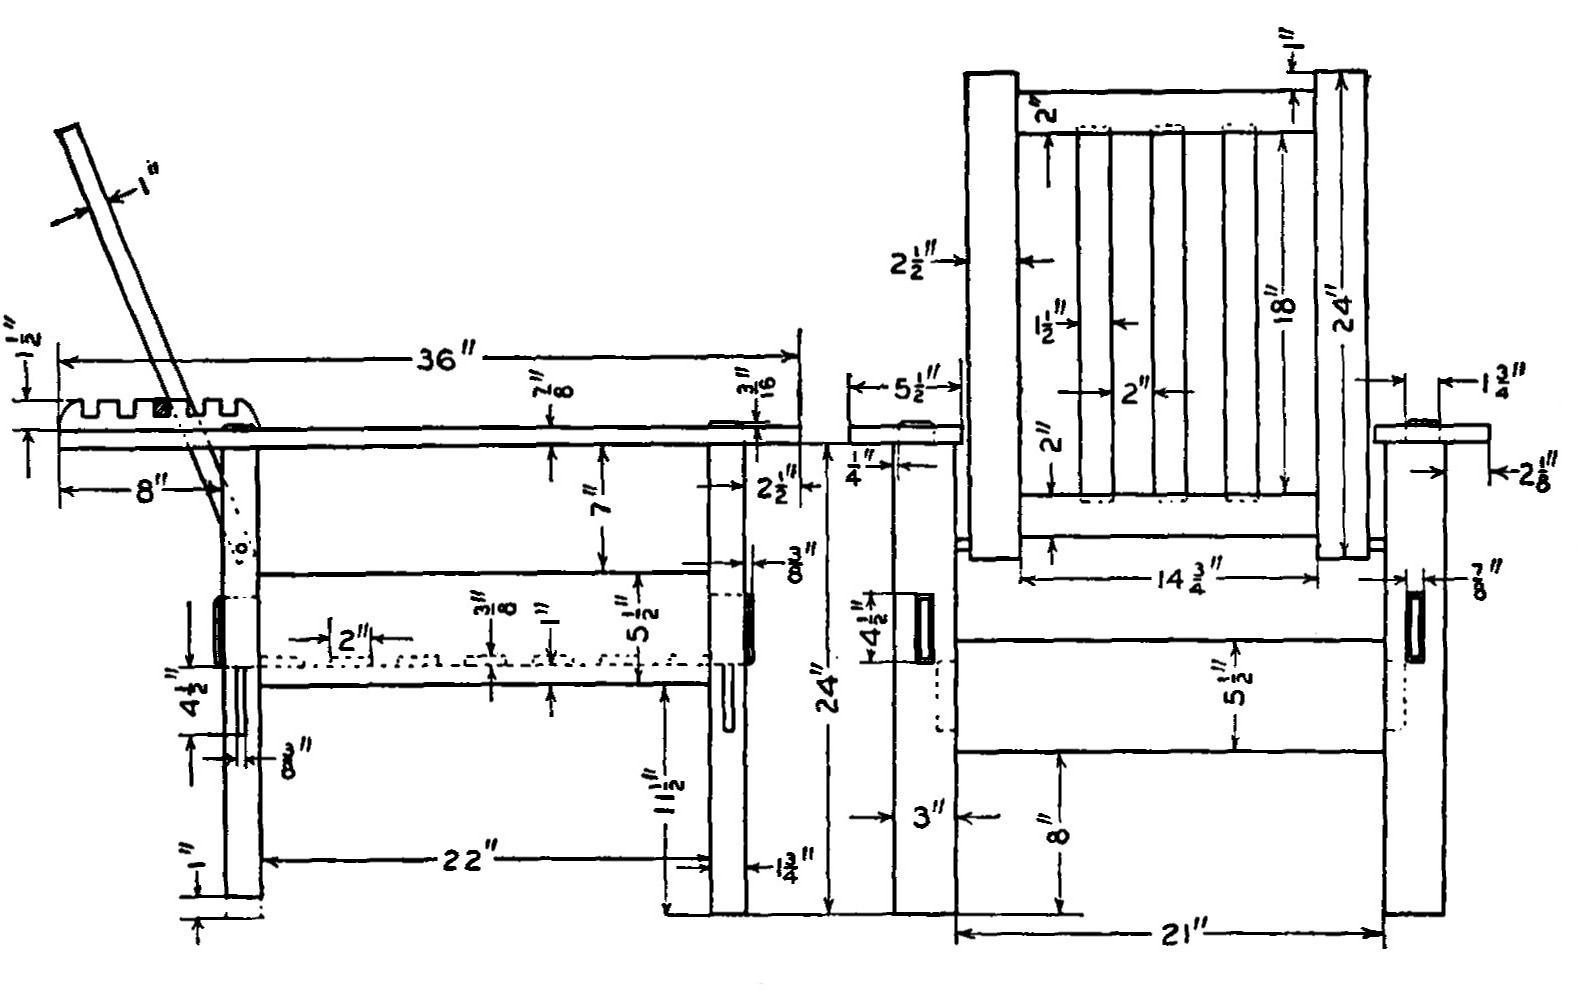 |
 Click the book image to turn
to the next Chapter.
Click the book image to turn
to the next Chapter.