Web
and Book design,
Copyright, Kellscraft Studio 1999-2016 (Return to Web Text-ures) |
 (HOME)
|
|
HOW TO MAKE A LAMP STAND
AND SHADE If a planing mill is
near, time and
patience will be saved by ordering one piece 1 3/4 in. square and 40
in. long,
two pieces 11/8 in. thick and 3 in. square, all planed and sandpapered
on all
surfaces. The long piece can then be cut at home to the lengths
specified
above. The 13 in. piece is for
the upright
and should have a 1/2 in. hole bored the full length through the
center. If the
bit is not long enough to reach entirely through, bore from each end,
then use
a red-hot iron to finish. This hole is for the electric wire or gas
pipe if gas
is used. The two pieces for the
base are
alike except the groove of one is cut from the top and of the other
from the
under side, as shown. Shape the under sides first. This can best be
done by
placing the two pieces in a vise, under sides together, and boring two
holes
with a 1 in. bit. The center of each hole will be in. from either end
and in
the crack between the pieces. The pieces can then be taken out, lines
gauged on
each side of each, and the wood between the holes removed with turning
saw and
scraper steel.
These parts may be put
together and
fastened to the upright by means of two long screws from the under
side, placed
to either side of the 1/2 in. hole. This hole must be continued through
the
pieces forming the base. The braces are easiest
made by
taking the two pieces which were planed to 1 1/8 in. thick and 3 in.
square and
drawing a diagonal on each. Find the middle of this diagonal by drawing
the
central portion of the other diagonal; at this point place the spur of
the bit
and bore a 1 in. hole in each block. Saw the two blocks apart,
sawing
along a diagonal of each. Plane the surfaces on the saw cut smooth and
sandpaper the curve made by the bit. Fasten the braces in place by
means of
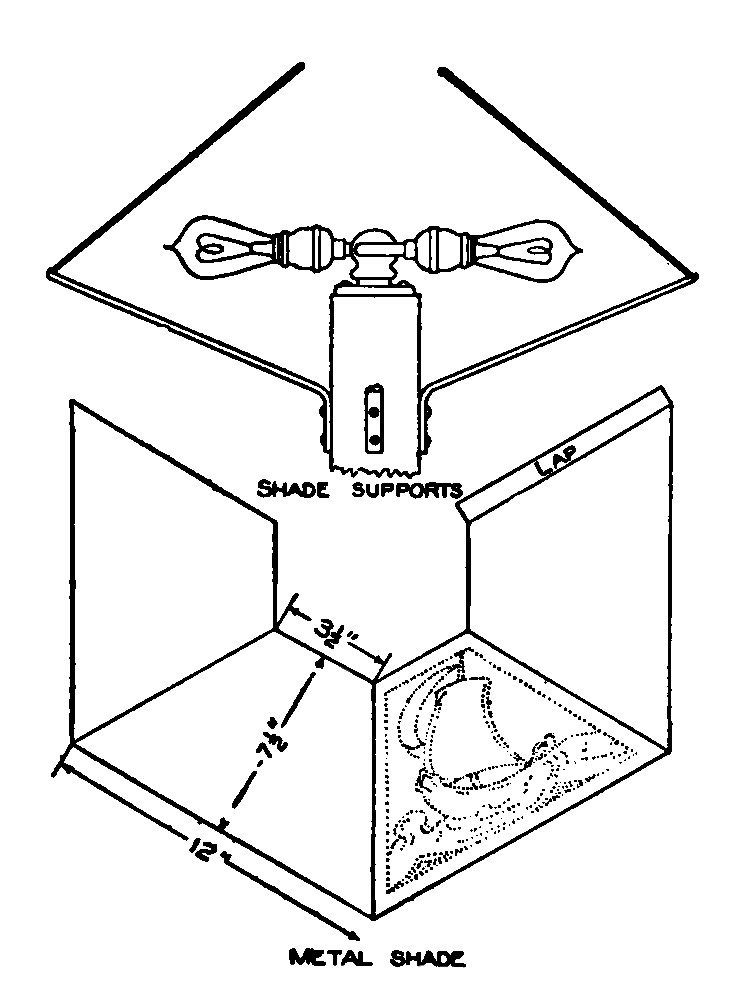
roundhead blued screws. To make a shade such as
is shown in
the illustration is rather difficult. The shade is made of wood glued
up and
has art glass fitted in rabbets cut on the inner edges. Such shades can
be
purchased ready to attach. The sketch shows one method of attaching.
Four small
pieces of strap iron are bent to the shape shown and fastened to the
four sides
of the upright. Electric globes — two, three or four may be attached as
shown. The kind of wood finish
for the
stand will depend upon the finish on the wooden shade, if shade is
purchased.
Brown Flemish is obtained by first staining the wood with Flemish water
stain
diluted by the addition of two parts water to one part stain. When this
is dry,
sandpaper the "whiskers" which were raised by the water and fill with
a medium dark filler. Directions will be found on the filler cans. When
filler
has hardened, apply two coats of wax. The metal shade as shown
in the
sketch is a "layout" for a copper or brass shade of a size suitable
for this particular lamp. Such shades are frequently made from one
piece of
sheet metal and designs are pierced in them as suggested in the
"layout." This piercing is done by driving the point of a nail
through the metal from the under side before the parts are soldered or
riveted
together. If the parts are to be riveted, enough additional metal must
be left
on the last panel to allow for a lap. No lap is needed when joints are
soldered.
Details of Construction
of Library
Lamp Stand A better way, and one
which will
permit the use of heavier metal, is to cut each side of the shade
separately
and fasten them together by riveting a piece of metal over each joint.
The
shape of this piece can be made so as to accentuate the rivet heads and
thus
give a pleasing effect. For art-glass the metal
panels are
cut out, the glass is inserted from the under side and held in place by
small
'clips soldered to the frame of the shade. Pleasing effects are
obtained by
using one kind of metal, as brass, and reinforcing and riveting with
another
metal, such as copper. 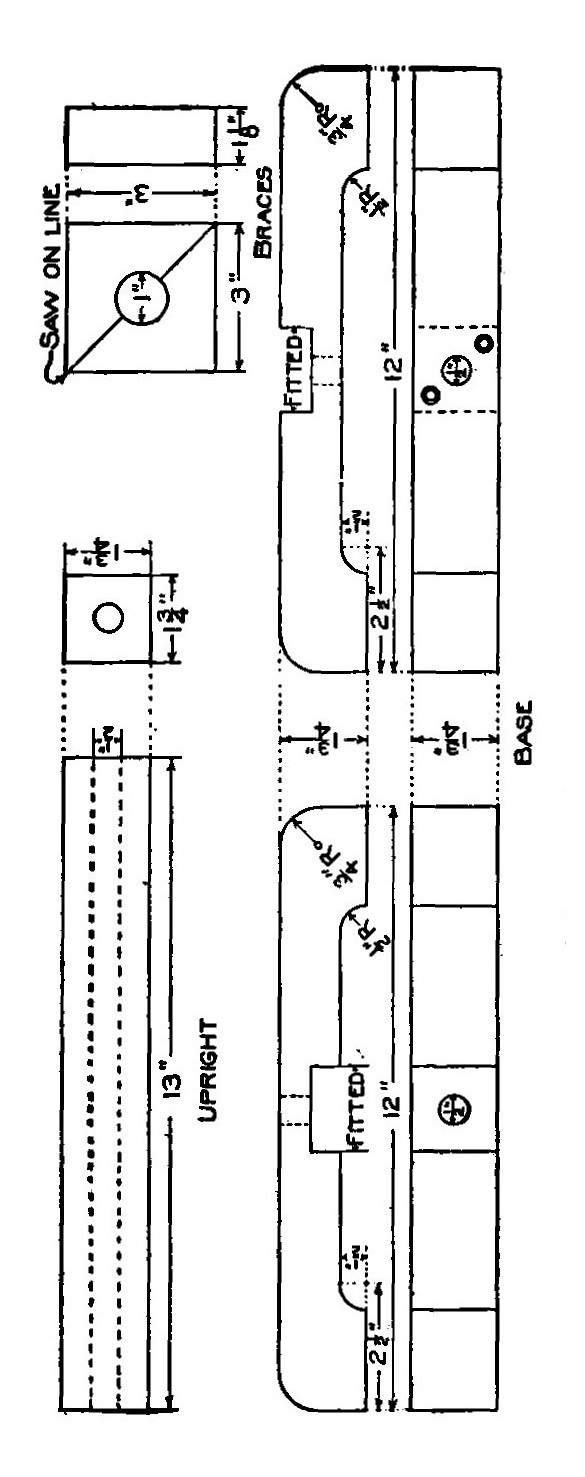 |

 Click the book image to turn
to the next Chapter.
Click the book image to turn
to the next Chapter.